


A few weeks ago, I started learning a tool called Apache airflow. It's a tool that several companies are using to schedule and monitor workflows. If you're interested in a tutorial then you can check out a series of articles I posted about the subject here and here. In the tutorial, I built a small project that gets data from an API and persists the data in an SQL Server database.
Airflow Architecture using Celery
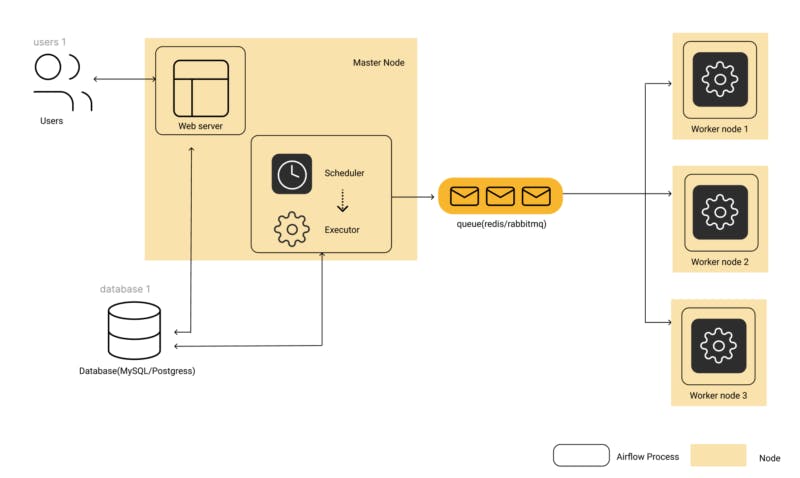
Fig 1: Airflow Architecture diagram for Celery Executor based Configs
Source: https://www.qubole.com/tech-blog/understand-apache-airflows-modular-architecture/
One of the components of Apache airflow's architecture is an executor. This component is responsible for the execution of the tasks specified on a DAG. There are several types for e.g. the SequentialExecutor, LocalExecutor, CeleryExecutor, KubernetesExecutor, etc. In the aforementioned airflow tutorial, I use the celery executor to execute the tasks in my data pipeline thus, in this article I'll discuss what celery is, and provide a basic use case of the tool. This tutorial is not a comprehensive review of the functionalities of celery. I suggest navigating to the celery docs provided in the reference section for a complete review of the tool. In the next section, I briefly discuss the relationship between task queues and celery.
Task Queues
A task queue is a medium to spread units of work across threads or machines. The input of a task queue is a unit of work called a task. Workers constantly monitor the task queue for new tasks.
Celery - an example of a task queue, acts a mediator between clients (producers of work) and a workers (consumers) using a message broker (message queue) which is demonstrated in fig 2 below.
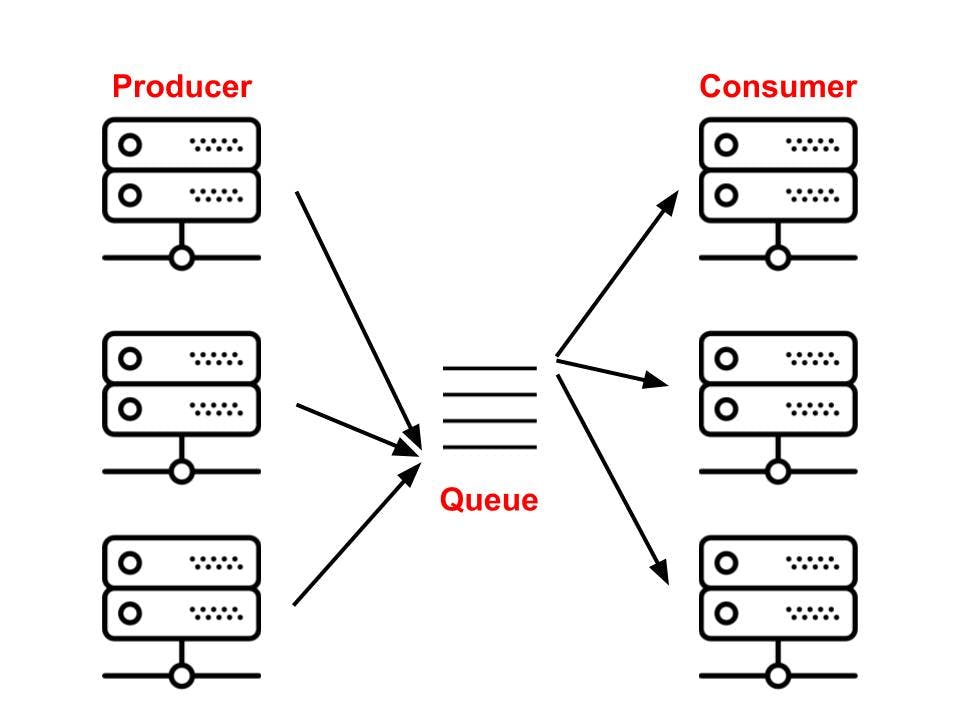
Fig 2: Overview of Celery architecture
IBM defines a message broker as some software that enables the exchange of information between applications, systems, and services. There are several kinds of brokers including RabbitMQ and Redis. Without these brokers, Celery will not be able to send and receive messages to/from the worker. In production, a celery system can consist of several workers and brokers which allows for high availability and horizontal scaling.
Using Celery
In this section, I'll provide a walk-through of how you can get started with python celery.
Requirements
- Python 3.7+
- A message broker for eg. RabbitMQ
- A results backend (eg. MySQL, Redis)
- Docker
We'll be using celery version 5.2 which runs on Python 3.7 or later. You can install celery using pip
pip install celery
A message broker can be started as a service or can be run using docker. In this tutorial, I run rabbitmq with docker. You can use the following command to start a rabbit-mq service using docker.
docker run -d --hostname localhost --name some-rabbit -e RABBITMQ_DEFAULT_USER=user -e RABBITMQ_DEFAULT_PASS=password -p 15672:15672 rabbitmq:3-management
If you use a MacOSX system, you can consult this gist to get MySQL running with homebrew otherwise, there are several resources on the open internet that can help you get MySQL running on other platforms.
Celery uses a results backend to persist the state of tasks sent to the broker. There's exists a plethora of backends to choose from including MongoDB and Redis however in this tutorial, I'll be using MySQL.
Tutorial
With all the prerequisites met, we can proceed to our tutorial.
Overview
In this very simple tutorial, I'll set up a celery application instance, create a simple task and dispatch this task to a worker. This tutorial is inspired by Celery's tutorial which can be found here
Project Layout
run_some_io_task.py
proj/__init__.py
    /celery.py
    /tasks.py
proj/celery.py
from celery import Celery

# app instance
app = Celery('proj', backend='db+mysql://rashid:password@localhost:3306/airflowdb', broker='amqp://user:password@127.0.0.1:5672//', include=['proj.tasks'])

if __name__ == '__main__':
    app.start()
The backend argument
The format for the backend argument if you're using MySql is as follows:
db+mysql://{user}:{password}@{server:port}/{database}
So we can create a user and a password a replace the parameters accordingly. I created a user called "rashid" with a password of "password" using the code snippet below.
CREATE USER 'rashid'@'localhost' IDENTIFIED BY 'password'
Next, I gave my user all privileges for an airflowdb database that I created earlier.
GRANT ALL PRIVILEGES ON *.* TO 'airflowdb'@'localhost';
FLUSH PRIVILEGES
The broker argument
The format the broker argument is as follows
amqp://{user}:{password}@{server}:{port}//
I previously set up a rabbit-mq instance with a default user called "user" and password called "password" so all we need to do is replace the parameters with the right credentials.
In the celery.py module, we've created an instance of Celery which is sometimes referred to as the app. We can use celery in our application by importing this instance as we'll see shortly.
proj/tasks.py
# importing the celery instance
from .celery import app
import time


@app.task
def some_io_task(x, y):
    time.sleep(10)
    print("Done sleeping. Executing the add command")
    return x + y
In this module, I've created a task that takes about 10 seconds to run. This task simulates some IO task like sending a receipt of payment to a client, or persisting the results of a stored procedure in a certain location.
Starting the worker
With our celery app instance and task created and our broker running, we can now start a worker that will listen for tasks and execute them with the code below. Make sure to execute this code in directory above the proj/ directory.
celery -A proj worker -l INFO
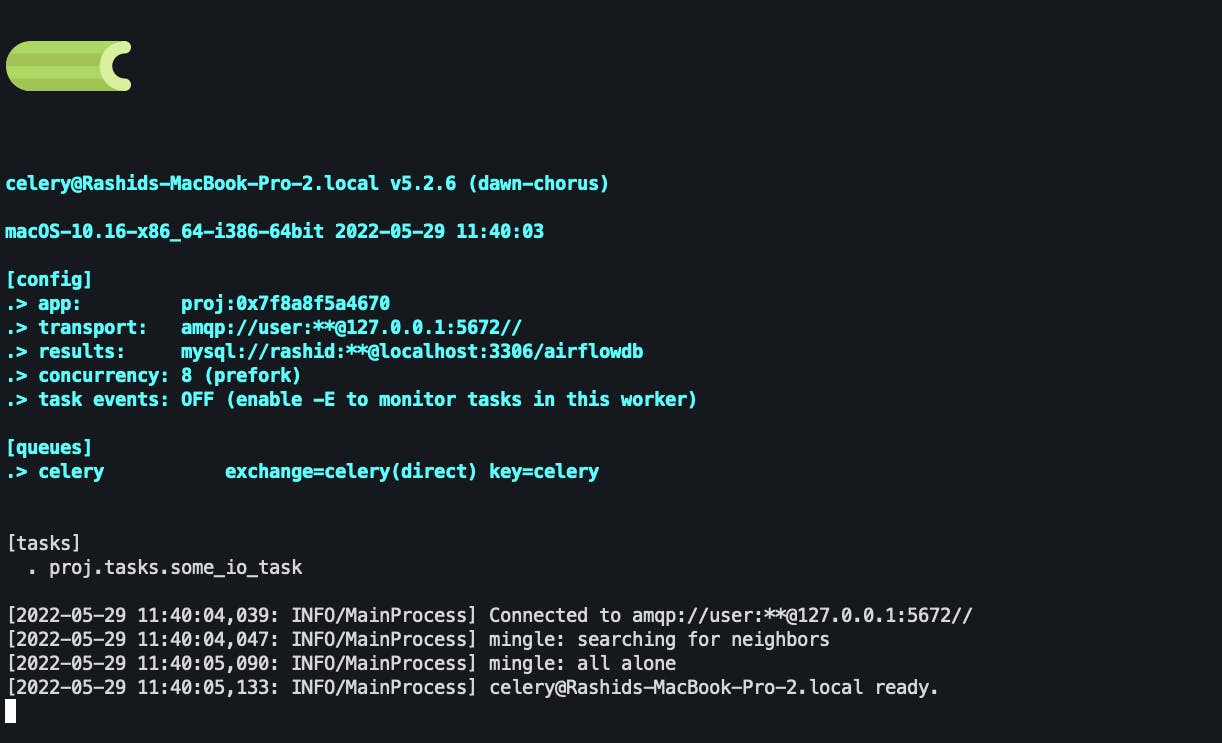
When the worker starts successfully you should see some messages
Calling Tasks
You can run a task by calling the delay() method on a task.
>>> from proj.tasks import some_io_task
>>> some_io_task.delay(2,2)
This method is a star-argument shortcut to another method called apply_async
some_io_task.apply_async((2,2))
apply_async allows you to specify execution options like the time to run or what queue the task should be sent to, and so on.
some_io_task.apply_async((2,2), queue='rashid_queue', countdown=10)
This will send the task some_io_task to a queue called rashid_queue and the task will be executed at earliest, 10 seconds after the message was sent.
Task states
You can determine if a task was successful or not by looking at a task's state.
>>> res = some_io_task.apply_async((2,2))
>>> res.state
'PENDING'
A task can only be in one state at a time however, it's state can progress through several states. The typical task will have the following stages
PENDING -> STARTED -> SUCCESS
You can read more about states here
run_some_io_task.py
from proj.tasks import some_io_task
import time

def show_status(some_string: str) -> None:
    print(f"Status: {some_string}")


if __name__ == '__main__':
    # some asynchronous task
    result = some_io_task.delay(2,2)

    while result.state != 'SUCCESS':
        time.sleep(1.5)
        show_status(result.state)
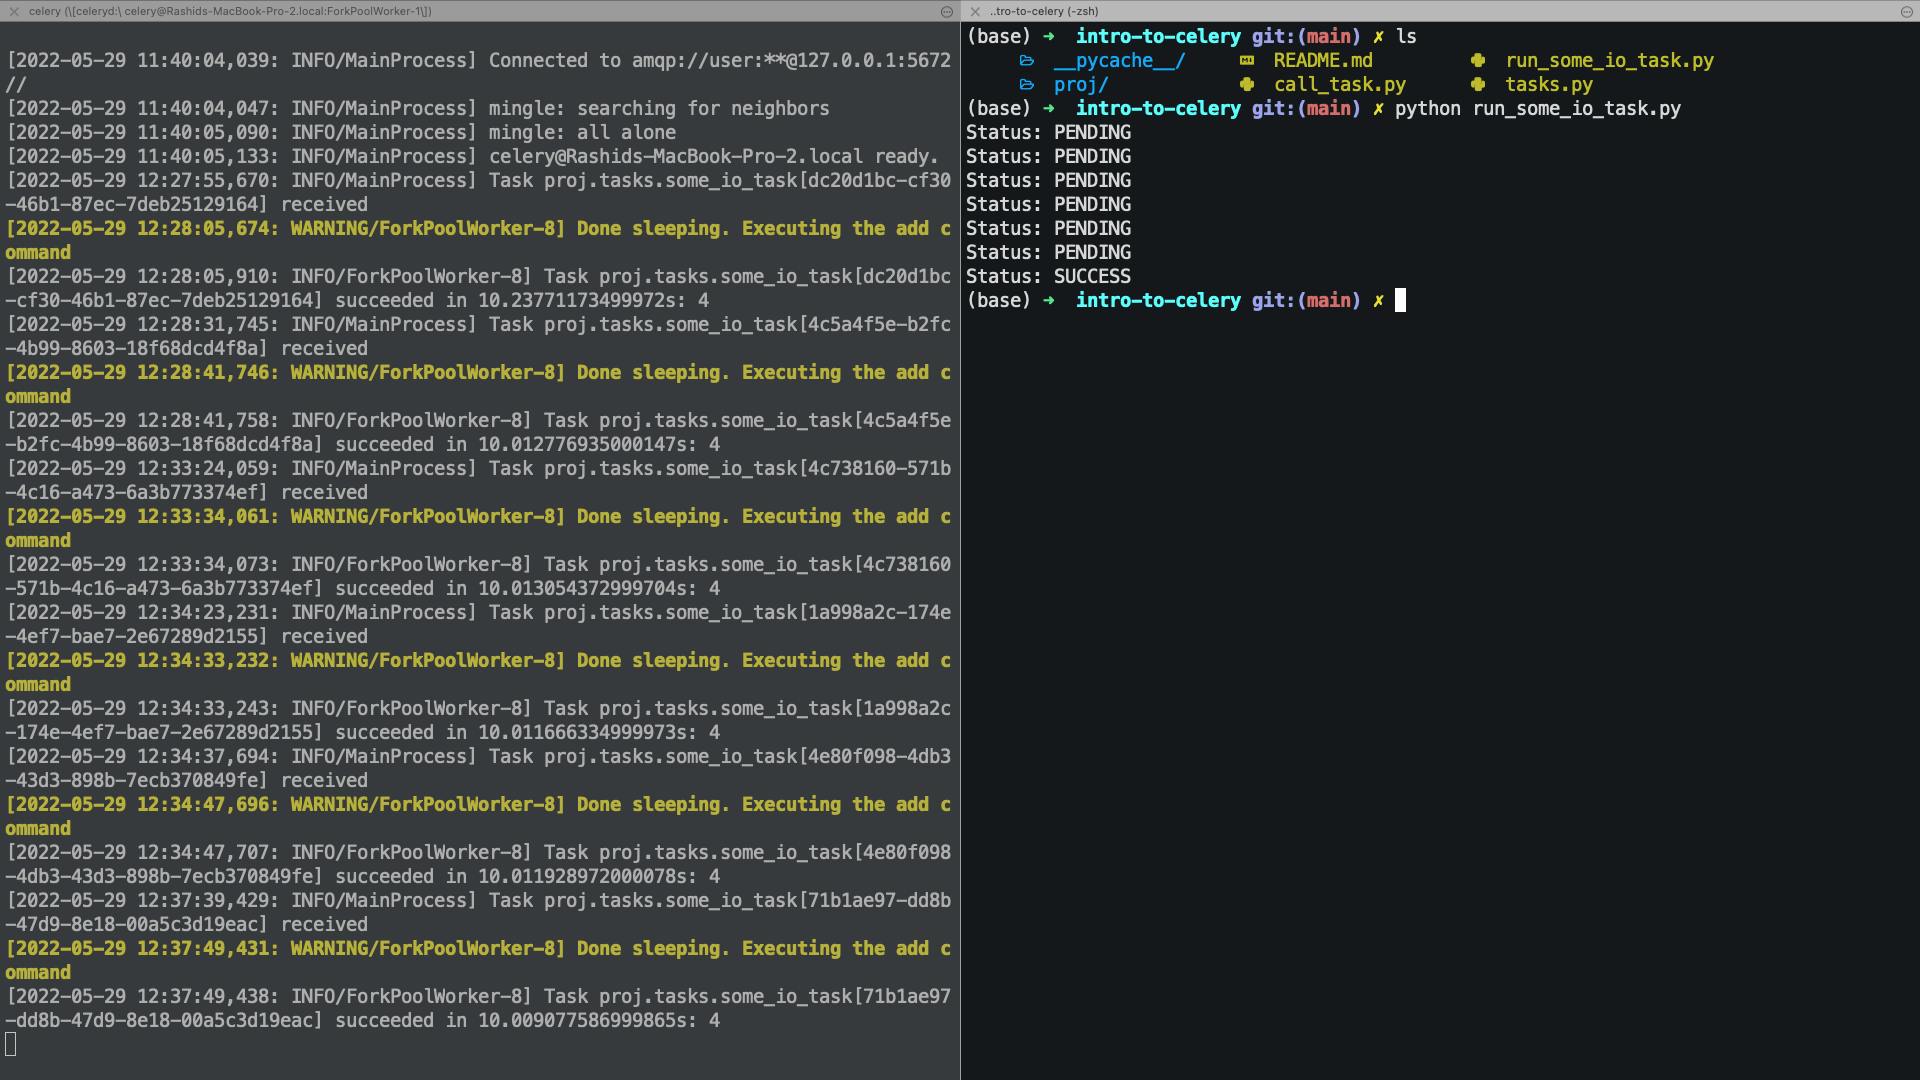
In this module, we run the some_io_task task and inform the user about the state of the task every 1.5 seconds. The output of a single run is shown on the right side of the image, whereas the logs of the worker are shown on the left.
Conclusion
In this brief tutorial, I've demonstrated how to get celery up and running. I've also demonstrated how an expensive IO task can be sent to a worker. Lastly, I demonstrated how we can observe the state of a task and send it to stdout.
References
Understand Apache Airflow's Modular Architecture
qubole.com/tech-blog/understand-apache-airf..