


In my previous blog, I briefly introduced apache airflow and mentioned how the tool can be used to orchestrate tasks however I did not set it up locally. This was a deliberate attempt to discuss the tasks I'd like to orchestrate before installing the orchestrator itself. This move is inspired by a presentation by Matt Davis - a data engineer at Clover, during the PyData SF 2016 event.
The tasks from the previous blog perform the following functions:
- Create an
employeesrelation. - Create an
employees_temprelation. - Get data from an API.
- Upload the data to a docker container.
- Upload the data into the
employees_temprelation. - Upsert the data into the
employeesrelation.
This setup simulates an etl process, where data is extracted from an API and is subsequently loaded to a staging area to be transformed. Finally, the transformed data is loaded to a new data store that various departments access to perform their respective business functions. In this blog, no transformation is performed.
In the next section, airflow is installed locally, and is subsequently used to orchestrate the tasks aforementioned. If you'd like a refresher in basic airflow concepts like idempotency, the airflow architecture, and others, then I highly suggest this introduction-to-airflow-basics page from Tania's documentation of her airflow workshop.
What is a DAG?
In airflow , a Directed Acyclic Graph (DAG) is basically a python configuration file where tasks are declared and organised. The organisation includes the definition of dependencies and relationships between the tasks. Let's take a look at the DAG for this tutorial.
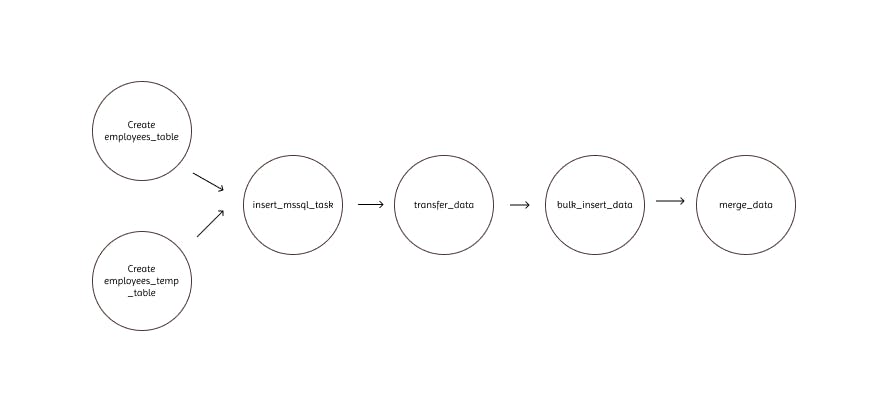
We can see that the DAG defines 6 tasks, dictates the order in which they have to run, and shows which tasks depend on what others. In addition, a dag definition will also define how often a dag should run for example, "every 5 minutes starting tomorrow", or "every day since May 5th, 2022". There are three ways to define a dag.
Using a context manager
with DAG(
        "dag_name", start_date=pendulum.datetime(2022, 1, 1, tz="UTC"),
        schedule_interval="@daily", catchup=False
        ) as dag:
    op = DummyOperator(task_id="dummy_task")
Using a standard constructor
dag = DAG("dag_name", start_date=pendulum.datetime(2022, 1, 1, tz="UTC"),
        schedule_interval="@daily", catchup=False)
op = DummyOperator(task_id="dummy_task", dag=dag)
Using a decorator
@dag(start_date=pendulum.datetime(2022, 1, 1, tz="UTC"),
        schedule_interval="@daily", catchup=False)
def generate_dag():
    op = DummyOperator(task_id="task_id")

dag = generate_dag()
Without tasks, DAGs are nothing.
Task Dependencies
In a data pipeline, a task is normally related to other tasks i.e. the task has dependencies on other tasks (upstream tasks) and other tasks depend on it (downstream tasks). The structure of a DAG is built entirely on these dependencies (the edges of the directed acyclic graph). Task dependencies can be declared in two ways
Using bitshift operators
first_task >> [second_task, third_task]
third_task << fourth_task
Using the explicit set_upstream and set_downstream methods
first_task.set_downstream(second_task, third_task)
third_task.set_upstream(fourth_task)
Loading a DAG
DAGS are loaded from Python source files located in airflow's DAG_FOLDER. Airflow executes each file in the DAG_FOLDER location and loads any DAG objects from that file.
Running a DAG
A DAG will run when:
- It is triggered either manually or via an API
- It is on a schedule defined as part of the DAG
DAGS do not require a schedule however it's very commonplace to have one defined. It is defined using the schedule_interval argument.
with DAG("daily_dag", schedule_interval="@daily"):
        . . .
DAG RUN
When a you run a DAG, you essentially create an instance of the DAG which airflow refers to as a DAG RUN. DAG Runs can run in parallel for the same DAG in a defined data interval, which specifies the period of data the tasks should operate on.
The usefulness of this parallelisation
Let's say we have a DAG that processes a set of transaction data on a daily basis however this DAG has been updated and we'd like to run the updated DAG on the previous three months of data. Airflow has the ability to backfill the DAG and run copies of it every day in those previous 3 months, all at once.
With the explanation of a DAG out of the way, we can proceed to get our hands dirty with a small project.
Getting your environment up and running
Firstly, you have to activate your environment using conda, venv, or pipenv.
Starting airflow locally
By default, the airflow home directory lives in ~/airflow however you can change it by setting the AIRFLOW_HOME environment variable prior to installing airflow. For example,
export AIRFLOW_HOME=~/mydir/airflow

# install airflow
pip install apache-airflow
I'll use the default location for this tutorial. Once the installation completes, you'll see an airflow directory whose contents look something like this.
drwxr-xr-x    - myuser 18 Apr 14:02 .
.rw-r--r--  26k myuser 18 Apr 14:02 ├── airflow.cfg
drwxr-xr-x    - myuser 18 Apr 14:02 ├── logs
drwxr-xr-x    - myuser 18 Apr 14:02 │  └── scheduler
drwxr-xr-x    - myuser 18 Apr 14:02 │     ├── 2019-04-18
lrwxr-xr-x   46 myuser 18 Apr 14:02 │     └── latest -> /Users/myuser/airflow/logs/scheduler/2019-04-18
.rw-r--r-- 2.5k myuser 18 Apr 14:02 └── unittests.cfg
Source: airflow-tutorial.readthedocs.io/en/latest/f..
You'll have to create your own /dags directory.
mkdir ~/airflow/dags
As your project grows, it may assume a structure like this
airflow                  # the root directory.
├── dags                 # root folder for all dags. files inside folders are not searched for dags.
│   ├── my_dag.py, # my dag (definitions of tasks/operators) including precedence.
│   └── ...
├── logs                 # logs for the various tasks that are run
│   └── my_dag           # DAG specific logs
│   │   ├── src1_s3      # folder for task-specific logs (log files are created by date of a run)
│   │   ├── src2_hdfs
│   │   ├── src3_s3
│   │   └── spark_task_etl
├── airflow.db           # SQLite database used by Airflow internally to track the status of each DAG.
├── airflow.cfg          # global configuration for Airflow (this can be overridden by config inside the file.)
└── ...
Source: airflow-tutorial.readthedocs.io/en/latest/f..
Prepare your metadata database
Airflow uses a database to keep track of tasks and their statuses thus it is essential to have one set up. By default, airflow uses sqlite however we'll be using MySQL in this tutorial. I chose MySQL because Tania mentions that parallelisation will not be possible if sqlite is used. If you're using a Mac, you can consult this gist to install MySQL.
After installing MySQL, create a database called airflowdb.
CREATE DATABASE airflowdb CHARACTER SET utf8 COLLATE utf8_unicode_ci;
Create a new user for the database
CREATE USER 'airflow'@'localhost' IDENTIFIED BY 'python2019'
Make sure the airflow user has access to the database
GRANT ALL PRIVILEGES ON airflowdb.* TO 'airflow'@'localhost';
FLUSH PRIVILEGES
Check the list of users to make sure the user was successfully added.
SELECT user, host FROM mysql.user;
Update your local airflow configuration
The airflow config file is called airflow.cfg and is stored in the airflow directory. The first change we'll make to change the executor that will be used. There are different kinds of executors that can be used namely the celery executor, the sequential executor, the mesos executor, and several others.
In this tutorial, we'll be using the CeleryExecutor. The celery executor requires a working installation of celery.
Installing celery
According to their website, Celery is a simple, flexible, and reliable distributed system to process vast amounts of messages, while providing operations with the tools required to maintain such a system. Prior to embarking on this journey to learn about airflow, I had never used celery. Task queueing is a very interesting concept and if this is the first you're hearing about it then I bid you farewell on your journey through a new rabbit hole. In this tutorial, I'll install celery and a message broker called rabbitmq. You can read more about these technologies by accessing their links in the reference section.
# install celery
pip install celery
Then run a rabbitmq instance with docker
docker run -d --hostname localhost --name some-rabbit -e RABBITMQ_DEFAULT_USER=user -e RABBITMQ_DEFAULT_PASS=password -p 15673:15672 rabbitmq:3-management
At this point, you should have celery installed, an instance of MySQL running, and finally an instance of rabbitmq also running. Now we're ready to update the configuration of airflow using airflow.cfg.
Open airflow.cfg and edit the executor.
executor = CeleryExecutor
Then update the broker_url, the result_backend, and the sql_alchemy_conn
# http://docs.celeryproject.org/en/latest/userguide/configuration.html#broker-settings
# needs rabbitmq running
broker_url = amqp://user:password@127.0.0.1:5672//


# http://docs.celeryproject.org/en/latest/userguide/configuration.html#task-result-backend-settings
result_backend = db+mysql://airflow:python2019@localhost:3306/airflowdb

sql_alchemy_conn = mysql://airflow:python2019@localhost:3306/airflow
Now we're ready to initialise the database with
airflow db init
Now let's start our web server locally
airflow webserver -p 8080
and finally, let's turn on our scheduler
airflow scheduler
Orchestrating the tasks
With airflow running, we can now create our first DAG in the /dag directory in the airflow home folder. Navigate to the /dag directory and create file called etl.py. Include the following code in the file
from datetime import datetime, timedelta
from airflow import DAG
from airflow.decorators import task
from airflow.operators.bash import BashOperator
from airflow.providers.microsoft.mssql.hooks.mssql import MsSqlHook
from airflow.providers.microsoft.mssql.operators.mssql import MsSqlOperator
import os
import requests
import pendulum


default_args = {
   'depends_on_past': False,
   'email': ['airflow@example.com'],
   'email_on_failure': False,
   'email_on_retry': False,
   'retries': 1,
   'retry_delay': timedelta(minutes=5)
}


with DAG (
   'Etl',
   default_args = default_args,
   description = 'A simple DAG tutorial using MSSQL',
   schedule_interval = '0 0 * * *',
   start_date = pendulum.datetime(2022, 5, 20, tz='UTC'),
   catchup = False,
   dagrun_timeout = datetime.timedelta(minutes=60),
   tags = ['example_mssql'],
) as dag:

   """The most basic ETL pipeline your soul will ever witness"""

   create_employees_table = MsSqlOperator(
      task_id="create_employees_table",
      mssql_conn_id="airflow_mssql",
      sql="""
      if object_id('dbo.employees') is not null
         drop table dbo.employees;

      create table dbo.employees (
         "Serial Number" INT PRIMARY KEY,
         "Company Name" VARCHAR(1000),
         "Employee Markme" VARCHAR(1000),
         "Description" VARCHAR(1000),
         "Leave" INT
      );
      """
   )


   create_employees_temp_table = MsSqlOperator(
      task_id="create_employees_temp_table",
      mssql_conn_id="airflow_mssql",
      sql="""
      if object_id('dbo.employees_temp') is not null
         drop table dbo.employees_temp;

      create table dbo.employees_temp (
         "Serial Number" INT PRIMARY KEY,
         "Company Name" VARCHAR(1000),
         "Employee Markme" VARCHAR(1000),
         "Description" VARCHAR(1000),
         "Leave" INT
      );
      """,
   )


   @dag.task(task_id='insert_mssql_task')
   def get_data():

      data_path = "./files/employees.csv"

      try:
         os.makedirs(os.path.dirname(data_path), exist_ok=False)
      except Exception as e:
         print("Directory already exists. Ignoring...")


      url = "https://raw.githubusercontent.com/apache/airflow/main/docs/apache-airflow/pipeline_example.csv"
      response = requests.get(url)


      with open(data_path, "w") as file:
         file.write(response.text)


   # transfer data to docker
   transfer_data = BashOperator(
      task_id='transfer_data',
      bash_command="/user/name/airflow/dags/scripts/test.sh "
   )


   @dag.task(task_id="bulk_insert_data")
   def insert_data():
      try:
         mssql_hook = MsSqlHook(mssql_conn_id='airflow_mssql', schema='jade')
         bulk_sql = f"""BULK INSERT dbo.employees_temp FROM '/var/opt/mssql/employees.csv' WITH (FIRSTROW=2, FORMAT='CSV')"""
         mssql_hook.run(bulk_sql)
      except Exception as e:
         print(e)
         print("Did not go as planned")
         return 1
      else:
         print("Successfully saved data")
         return 0


   @task
   def merge_data():
      query = r"""
         MERGE
         INTO dbo.employees as target
         USING (
            SELECT DISTINCT * FROM dbo.employees_temp
         ) as source
         ON (target."Serial Number" = source."Serial Number")
         WHEN MATCHED
            THEN UPDATE
               SET target."Serial Number" = source."Serial Number"
         WHEN NOT MATCHED
            THEN INSERT VALUES (source."Serial Number", source."Company Name", source."Employee Markme", source."Description", source."Leave");
      """

      try:
         mssql_hook = MsSqlHook(mssql_conn_id="airflow_mssql", schema="jade")
         mssql_hook.run(query)

      except Exception as e:
         return 1

      else:
         print("Successfully merged employees")
         return 0


   # Completing our DAG
   [create_employees_table, create_employees_temp_table] >> get_data() >> transfer_data >> insert_data() >> merge_data()
What do we have here?
etl.py is a DAG definition file. It only specifies the DAG's structure as code. The execution of the tasks take place outside the context of this script.
Default arguments
During the creation of a DAG and some tasks, we have the option of explicitly passing a set of arguments to each task's constructor increasing redundancy, or, we can define a dictionary of default parameters that we can use when creating tasks.
Tasks
A task is created when an operator object for e.g. BashOperator, is instantiated. For the transfer_data task, create a directory called scripts within your /dags folder, then create a file called test.sh and populate it with the following snippet.
# This script is used to copy the data into the docker container

docker cp "/Users/rashid/airflow/dags/files/employees.csv" datawarehouse:/var/opt/mssql/


if [[ $? -ne 0 ]]
then
  echo "Unable to copy employees.csv to the datawarehouse" >&2
  exit 1
fi

echo "Successfully copied employees.csv to the datawarehouse. Ready for BULK INSERTION"

exit 0
Command Line Metadata validation
Let's run a few commands to validate our python script
# initialise the database tables
airflow db init

# print the list of tasks in the etl DAG
airflow tasks list Etl

# print the hierarchy of tasks in the Etl DAG
Testing
We are now ready to test our tasks and DAG for a specific date. This is date is referred to as an execution/logical date (for historical reasons). This will cause the scheduler to run our tasks/DAGS for a specific date and time, even though it physically will run now (or as soon as their dependencies are met).
A scheduler runs a task for a specific date and time, not at. This is because conceptually, a DAG run represents an interval between two times instead of a specific date and time.
# testing create employees
airflow tasks test Etl create_employees_table 2022-05-06

# testing insert_mssql_task
airflow tasks test Etl insert_mssql_task 2022-05-06
We can also test the DAG in the same way
airflow dags test Etl 2022-05-06
This will perform a DAG run of the given dag_id.
Running our DAG
We have successfully wrapped our tasks in a DAG and we're ready to run the DAG. The DAG is configured to
- run every day a midnight starting on May 20, 2022
- only run once in the event that days are missed, and
- timeout after 60 minutes
Save this code to a python file in the /dags folder (e.g. dags/etl.py) and after a short time, the Etl DAG will be included in the list of available DAGS in the UI. You can trigger the Etl DAG by unpausing it (via the slider on the left end) and running it (via the Run button under Actions).

or by triggering it in the command line
airflow dags trigger Etl
Conclusion
There are several concepts that I've left out of this article for the sole purpose of brevity. Thus, I entreat you to do further reading about this tool if you're planning on using it as an aspiring data engineer. The airflow documentation has everything you need to know. Additionally, build some small projects to improve your understanding of its functionality. As a suggestion, you can include a transformation step in the tutorial. I've also provided links to the materials I referenced while crafting this piece of work. Please reach out to me in the comments if you didn't understand any part of this article and I'll be more than willing to assist in any way. Thanks for reading and see you in the next one.
References
Airflow docs
airflow.apache.org/docs/apache-airflow/stab..